


This is a step-by-step tutorial on how to connect your Google Analytics (GA) pageview data with your Algolia Index data. This blog post assumes that:
- you already have an Algolia instance up and running
- you have already set up GitHub Actions
- you are already tracking pageviews with Google Analytics and have pageview data to import to Algolia
If you are new to Algolia, 👉 check out my blog post on how to implement Algolia on a Gatsby Site 📚
I am going to show you how you can optimize search results being returned from Algolia by adding GA pageview data to your Algolia Index.
We have implemented Algolia on our Gatsby app and we are deploying the app via Github Actions to AWS, thereby using Github Secrets to set environment variables.
The auth of the Google Analytics API was not as straightforward as the docs say, since we have an open source repo and have to use GitHub Secrets to store our keys. I would like to share with you today, how we achieved this in GitHub Actions 🚀
I will walk you through the Algolia Docs solution and show you the adjustment that I made to the code to fit our index and GitHub Actions use case. Without further ado, let’s get started 🌟
Part 1: Google Analytics and script
Google Analytics prep
Algolia Docs provides excellent support on how to get started in Google Analytics and in your app. Algolia walks you step-by-step through how to:
-
Create a Service Account in GA through the Google API Console. You will now receive a JSON file, which is very important. Do not share this data or this file and store it in a safe location. We will need this file for your Google Analytics API auth later on and for Github Secrets.

-
Login to Google Analytics and navigate to `View User Management`. Add the new service account email you just created as a user and give it permission to ‘Read & Analyze’. You might need to ask an Admin to do this step for you.
-
In the Google Analytics view Admin tab copy your View ID. We have to add this to GA_PARAMETERS in our script later on.

Note:
The Algolia docs say that your records must have an attribute with the full URL of the associated page for the foloowing script to work. Our Algolia implementation indexes only the path of every associated page. I there adjusted the script to look for only the path in Algolia. I will show you later on how to do that in the Main function in ga_connector.jsIn your App create /ga_connector.js
This file is our script that is going to fetch the Google API pageview data and inject it into our Algolia records. I will walk through you the code in this file chronologically.
First, import `algoliasearch` and `google` at the top. Then define the parameters, you want to fetch from the Google Analytics API:

Now, define your parameters. This file is committed to our open source repo and can therefore not contain any secret keys or values. You can store as many keys and names as you like in GitHub Secrets and then call them via
process.env.<GITHUB_SECRET_NAME>. You can see an example for the ALGOLIA_ADMIN_KEY below. You can also define a time period for your data, for example, fetch all pageviews within30 days.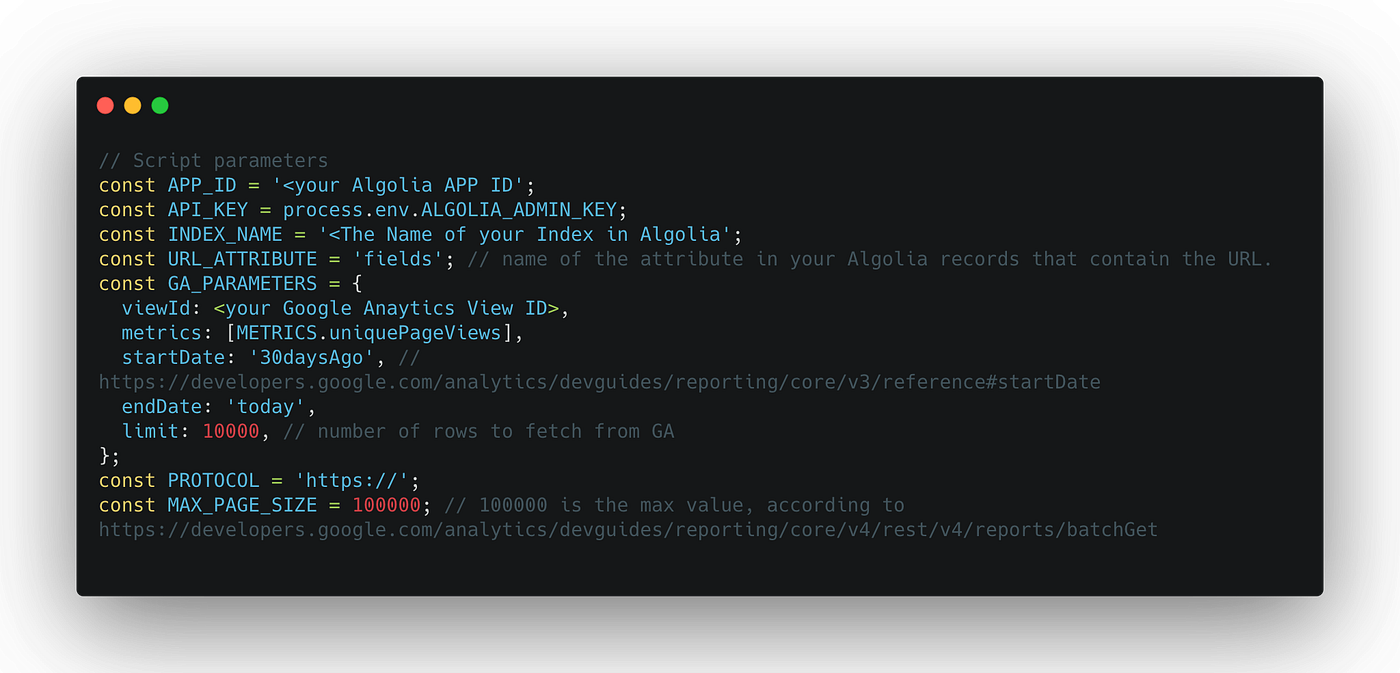
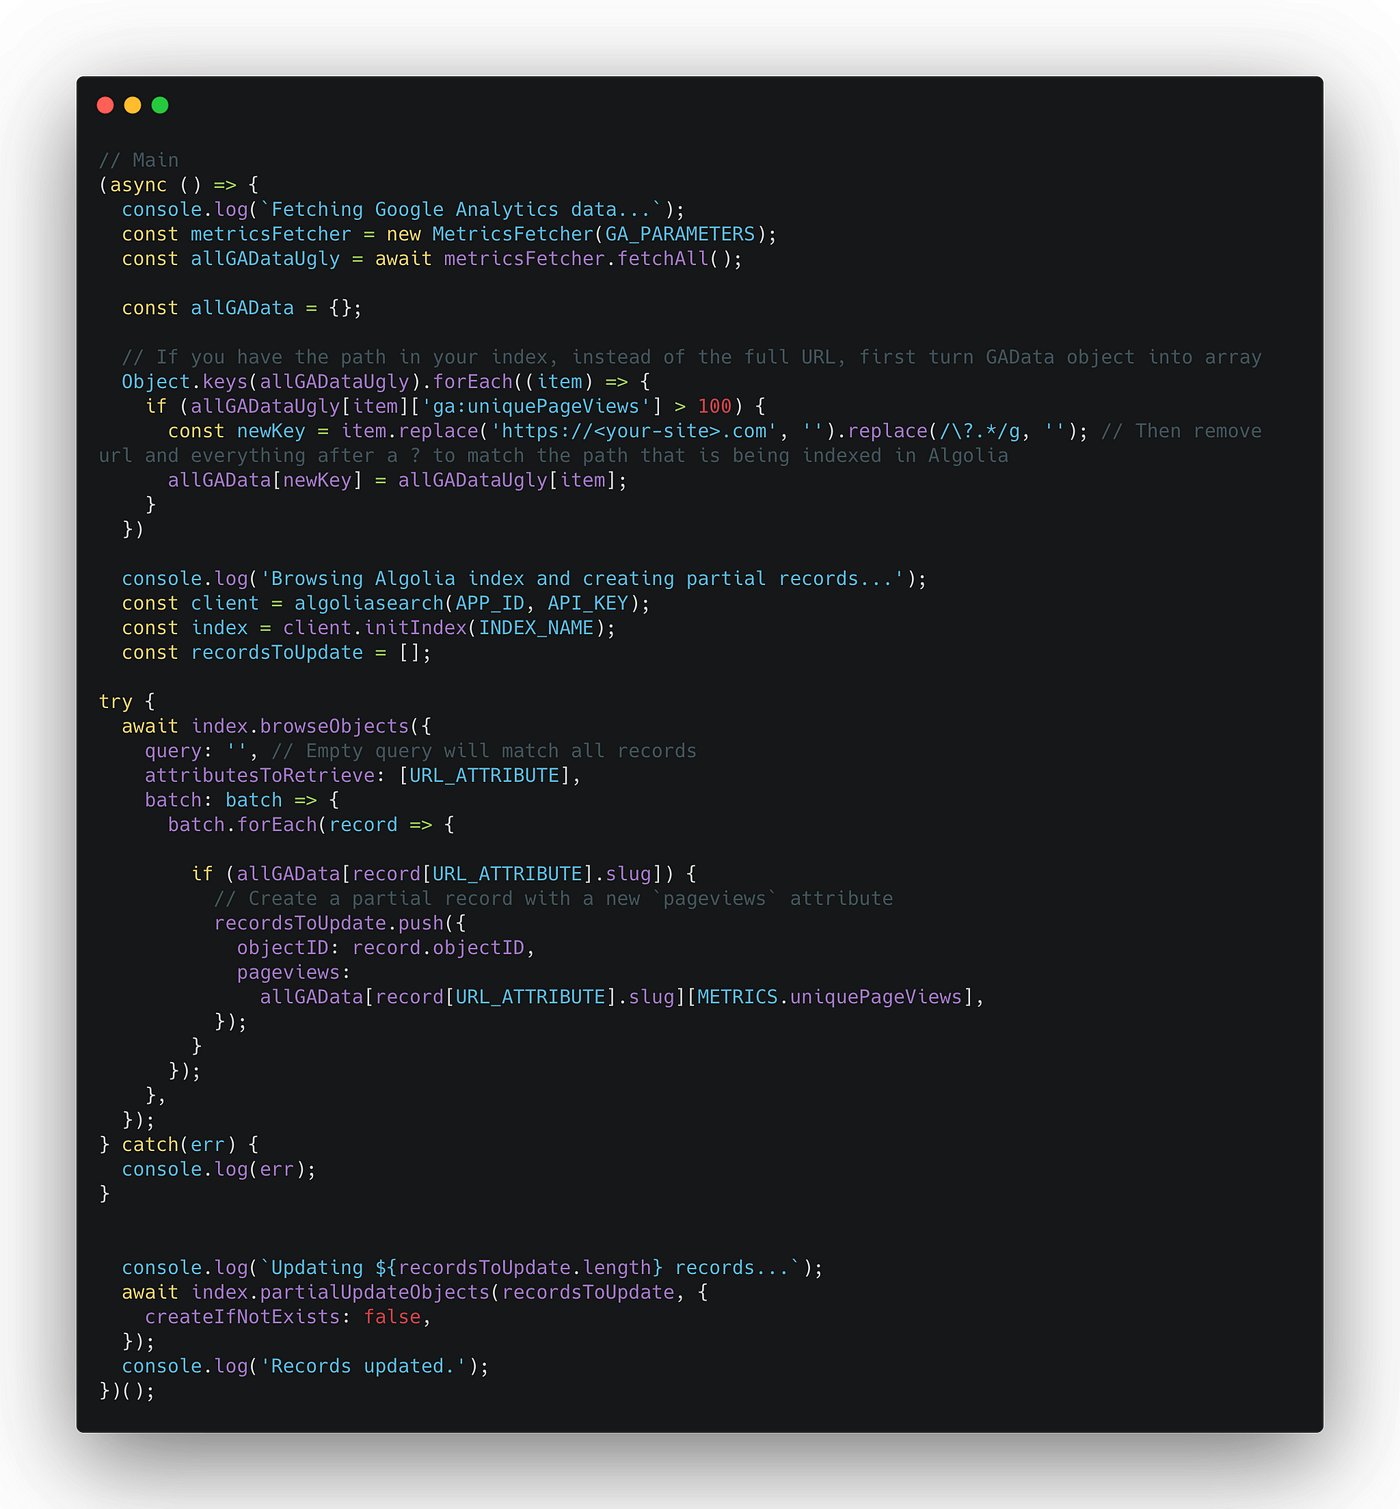
Next, copy and paste the code from the Algolia docs. Here you fetch the GA data and inject it into your Algolia records 🙌

The last step of the script is to adjust the main function. If your Algolia records contain an attribute with the full URL for every page, you can copy and paste the code provided in the Algolia docs. Our Algolia records contain the path to every page and we, therefore, had to add an adjustment.
The code below the first comment shows you my adjustment.
In order to match the path in Algolia with the path in Google Analytics, you first have to await the
metricsFetcher.fetchAll()and store it in a variable `allGADataUgly`. Then you turn the GADataUgly object into an array.I set a conditional to fetch only pages with more than 100 page views but this is optional. With the replace() method, you then remove the URL and remove everything after a
?to match the ‘path’ that is found in the Algolia attribute. -
-
And that is it for our script and we can now test it 👏
In order to test your script and connections from Gooogle Analytics API to Algolia, create an auth.json file, and copy and paste the JSON, which you received from the Google Service Account that you created earlier. If you have an open-source repo, make sure to include the file name into your .gitignore.
Do not track this auth.json file with GitHub as it contains sensitive information and keys ❌
You can now run the script in your terminal:
GOOGLE_APPLICATION_CREDENTIALS=path/to/your-auth.json node ga_connector.jsGo to your Algolia index dashboard and you should see the pageviews populating your records 🔥🔥🔥
Part 2: GitHub Action & GitHub Secrets
Now comes the fun part.
Running this script in Github Actions is not that simple, because it expects the auth.json file input for Google Analytics API auth. You, therefore, have to rewrite the code to run with Node.JS and copy and past every important key and ID into Github Secrets, to protect them from the public.
This is what our Github Action looks like:
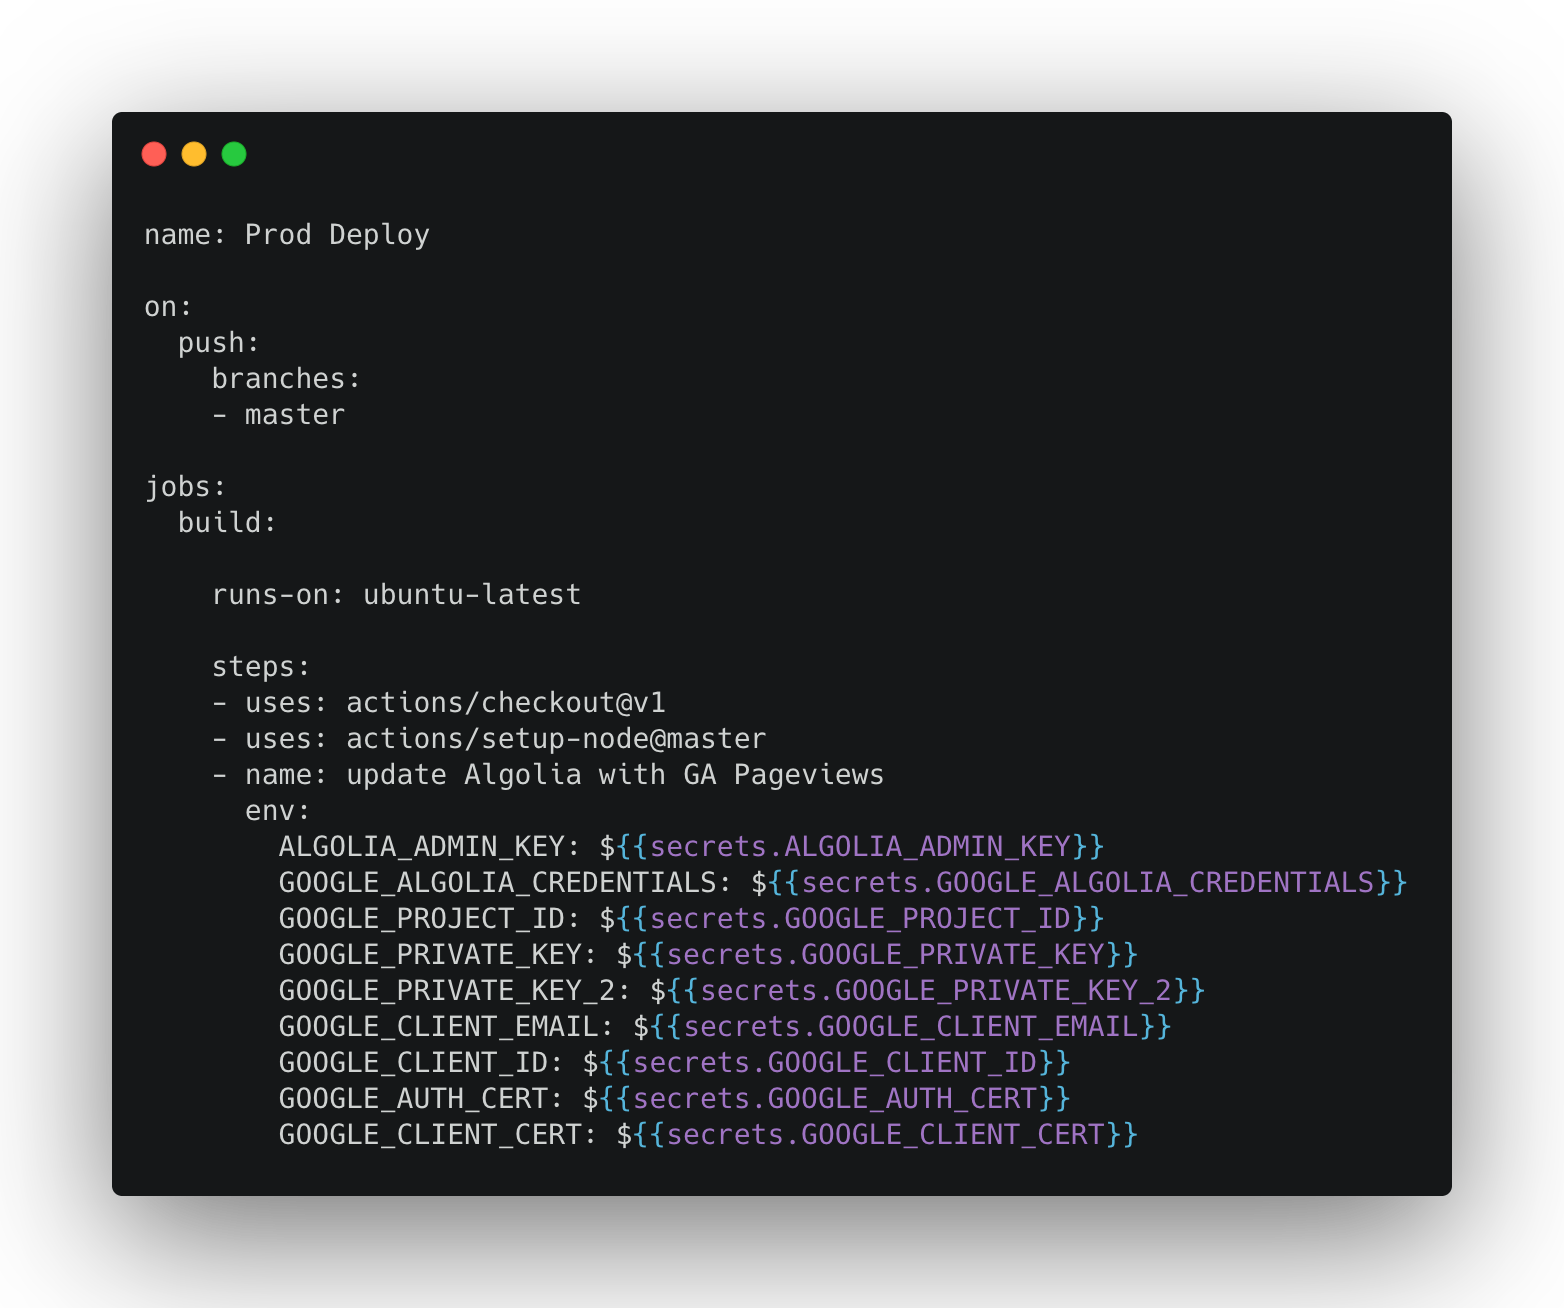
If you compare this Action with your auth.json file, you can see that we included all of the keys and values into GitHub Secrets and we call these as environment variables here in the GitHub Action.
You can find the
Secretsin your GitHub repo underSettings: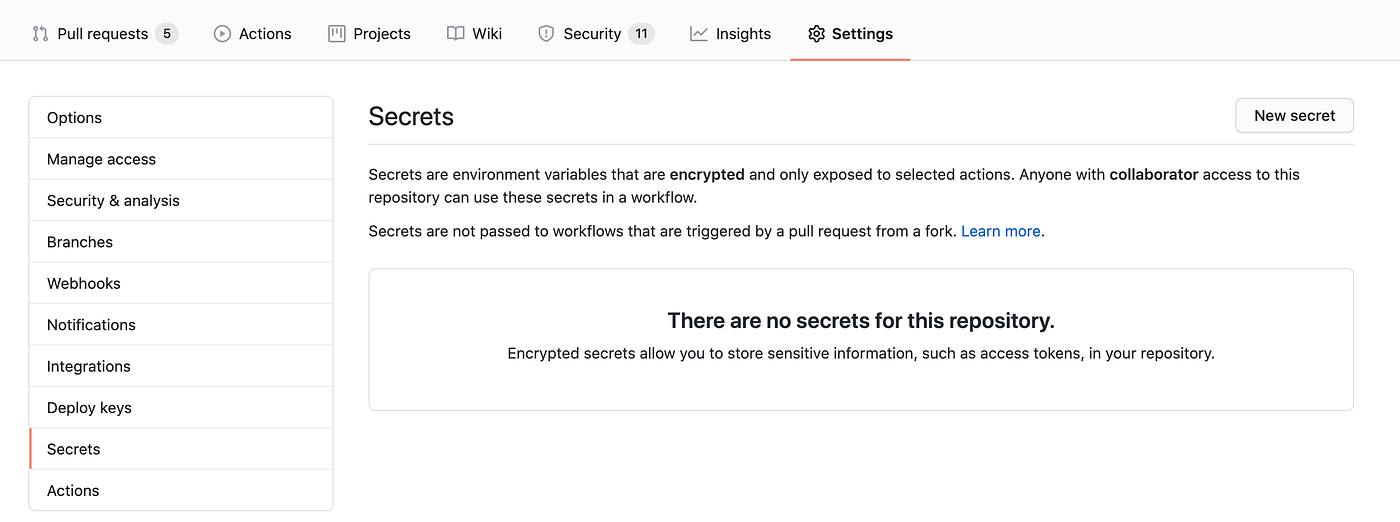
In the second part of the GitHub Action, we use NodeJS to create a new auth.json file with
writeFile()for Google Analytics API auth and then remove auth.json again withrm -rf auth.json. We include the env variables from GitHub Secrets into that newly created auth.json file withJSON.stringify()and remove any//with thereplace()method.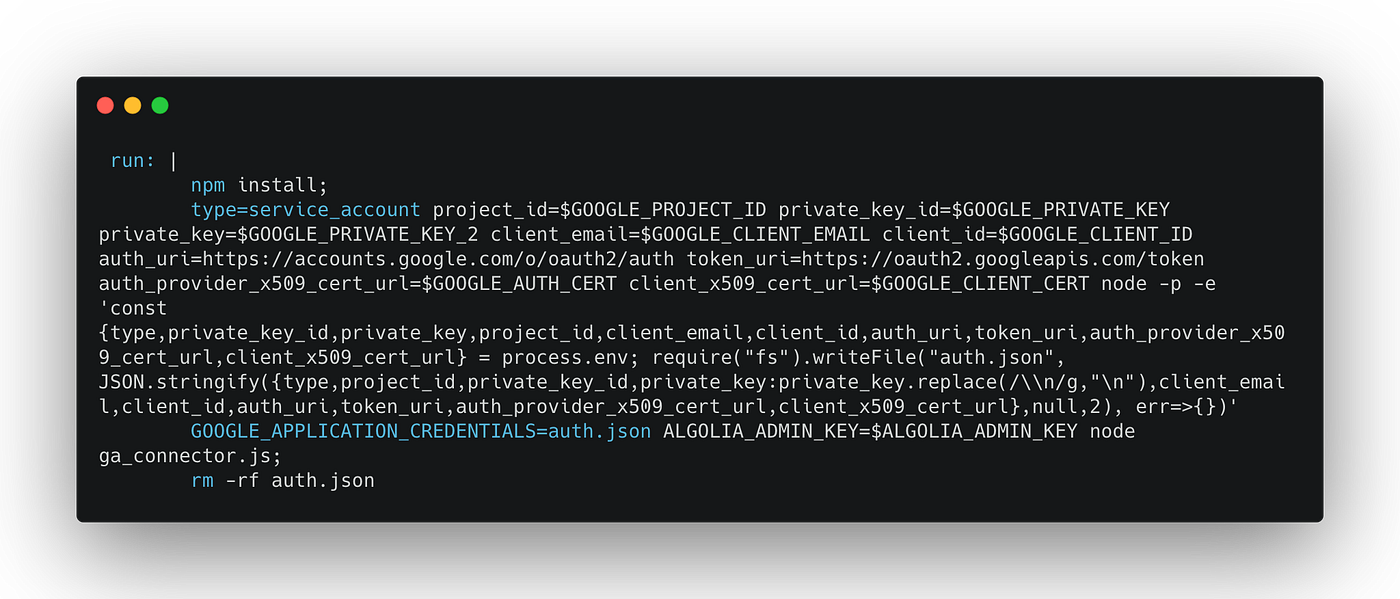
And that is it! 🎉 You can now commit your code and run your GitHub Action and you will see your Google Analytics pageview data injected into Algolia, every time your action runs.
🚀 Huge Kudos to Brian Swisher for helping me get the Google Analytics API auth working in GitHub Actions 🙌